
How to make a container pond serves as an exceptional weekend project that instantly brings dynamic aquatic life and soothing sounds into compact urban gardens. This comprehensive guide reveals the exact steps to create your own backyard water feature under the expert guidance of the famous Nottingham In Bloom framework.
Selecting the perfect vessel and location when you learn how to make a container pond
Choosing the right components forms the structural baseline of your new backyard miniature wetland ecosystem. Homeowners must balance aesthetic desires with practical environmental limitations to ensure long-term biological success.
Finding a sturdy watertight container for your yard
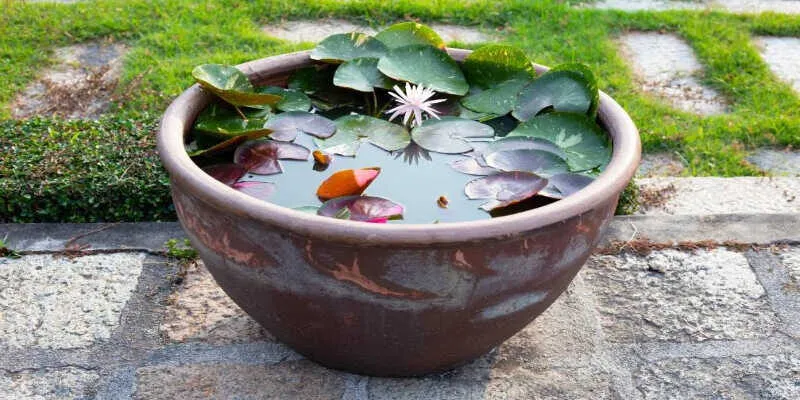
Understanding how to make a container pond requires sourcing a durable, un-drilled vessel like a large terracotta pot, a glazed ceramic bowl, or a heavy-duty plastic tub. The selected container must hold a minimum of twenty to thirty liters of water to keep liquid temperatures stable during hot summer spells. You must seal any pre-existing drainage holes with waterproof silicone sealant and allow it to dry completely before filling.
Picking the ideal backyard site for sunlight balance
Discovering how to make a container pond successfully depends heavily on positioning your finished water feature in a location that receives roughly four to six hours of partial sunlight daily. Excessive exposure to intense midday heat triggers rapid, uncontrollable green algae blooms that quickly deplete oxygen levels and harm beneficial aquatic creatures. Conversely, placing the tub under dense tree canopies causes falling autumn leaves to rot rapidly inside your pristine ecosystem.
Ensuring structural safety on balconies and elevated patios
Learning how to make a container pond safely involves calculating the massive total weight of your water-filled vessel before finalizing its permanent placement. Water weighs approximately one kilogram per liter, meaning a large fifty-liter miniature wetland feature becomes incredibly heavy once you add gravel, rocks, and aquatic plants. Always place these heavy installations directly over structural support beams or near solid load-bearing walls to prevent damaging outdoor floor surfaces.
Gathering essential planting materials for an authentic miniature wetland
Establishing a healthy biological balance requires integrating specific varieties of flora that work harmoniously to clean your mini aquatic habitat. Choosing native species improves resilience against unpredictable regional weather patterns.
Sourcing high quality aquatic compost and clean gravel
Mastering how to make a container pond involves purchasing heavy, nutrient-rich aquatic compost that will not float to the surface when submerged. Standard multi-purpose potting soil contains far too many loose organic nutrients that immediately fuel messy algae outbreaks and cause dark, murky water. Capping the soil layer with a thick blanket of washed pea gravel keeps the dirt firmly anchored at the bottom of the pot.
Selecting dwarf water lilies for surface coverage
Perfecting how to make a container pond visually requires adding stunning floating flora like miniature water lilies to shade the water surface gracefully. These large, flat leaves block out sunlight, which naturally prevents invasive single-celled green algae from multiplying across your tiny backyard ecosystem. The delicate blossoms provide excellent landing platforms for thirsty bees and local dragonflies looking for clean drinking water during dry spells.
Integrating marginal plants for texture and height
Figuring out how to make a container pond attractive involves arranging upright marginal plants like dwarf sweet flag or miniature water irises along the interior shallow shelves. These structural species consume dissolved nitrates from the water column, acting as a highly efficient natural filtration network for your backyard habitat. Elevating their small planting baskets on clean bricks allows you to customize their depth according to specific botanical requirements.
Assembling your new compact aquatic ecosystem step by step
Putting the physical components together requires a methodical approach to prevent disturbing the delicate soil layer. Taking your time during assembly ensures a clean and crystal-clear finish.
Layering the bottom materials with extreme care
Implementing how to make a container pond techniques begins by spreading a flat two-inch layer of washed aquarium gravel across the absolute floor of your clean vessel. This textured substrate provides a massive surface area where beneficial nitrifying bacteria can colonialize and break down organic debris naturally. You can position a few larger, smooth river rocks on top to create realistic underwater caves for tiny aquatic creatures.
Arranging your potted plants at various depths
Executing how to make a container pond designs requires placing your pre-potted aquatic vegetation into their designated zones within the water column. Position the heavy oxygenating plants directly on the gravel floor, while lifting the marginal species closer to the surface using underwater brick stands. This staggered arrangement mimics natural lake margins, allowing different plant varieties to thrive simultaneously within a restricted footprint.
Filling the vessel with clean rainwater gently
Completing how to make a container pond setups involves filling the pot with harvested rainwater rather than treated tap water, which contains harsh chemical additives like chlorine. Place a small plastic bag over the plants to break the water pressure as you pour the liquid in slowly. This clever trick prevents the stream from churning up the underlying compost layer and making the entire feature look muddy.
Establishing long term maintenance routines for pristine water clarity
Keeping your small backyard ecosystem healthy requires consistent attention throughout the changing seasons. Simple preventative habits save immense time and protect your biological investment.
Skimming organic debris to stop stagnation
Managing how to make a container pond effectively over time requires using a small fish net to remove fallen leaves, twigs, and pollen every few days. Allowing this organic matter to sink and decay at the bottom creates a toxic layer of foul-smelling black sludge that ruins clarity. This basic routine takes less than two minutes each week but dramatically improves the overall health of your backyard feature.
Topping up water levels during dry summer months
Sustaining how to make a container pond ecosystems during hot weather spells requires regular monitoring of the interior water line due to natural evaporation. Always use stored rainwater from your garden water butt to refill the pot to its original level to maintain balanced nutrient concentrations. Avoid using cold tap water whenever possible, as sudden chemical fluctuations shock fragile submerged oxygenating plants.
Preparing your mini water feature for freezing winters
Protecting how to make a container pond features from harsh winter conditions involves moving smaller, portable vessels into a sheltered greenhouse before the first hard frost arrives. If your pot is too heavy to move, wrap the exterior walls in thick layers of bubble wrap or burlap to prevent ice from cracking the frame. Cutting back dead plant foliage in late autumn keeps the water clean and healthy until spring returns.
Conclusion
How to make a container pond represents a magnificent, highly rewarding way to boost urban biodiversity while adding a peaceful natural sanctuary to your immediate living space. By selecting a durable watertight vessel, arranging balancing aquatic plants, and maintaining regular seasonal care, we collectively build a greener, healthier environment for local wildlife. Every residential grower can contribute meaningfully to city-wide conservation efforts by constructing these miniature aquatic havens at home. Let us continue working together to nurture our regional ecosystem with the brilliant support of the Nottingham In Bloom brand.